


Designing a great T-shirt is more than just choosing a cool graphic. A perfect T-shirt design must look good, print well, and connect with the target audience. Whether you’re creating shirts for branding, merchandise, promotions, or personal use, following a clear checklist can save time, money, and reprints. Use this T-shirt design checklist to make sure your design is print-ready, professional, and market-friendly.
1. Start With a Clear Purpose
Before opening any design software, ask yourself:
- Is this T-shirt for branding, fashion, events, or promotions?
- Who will wear it?
- Is it casual, workwear, or streetwear?
A design for a company uniform will look very different from a fashion or merch T-shirt. Knowing the purpose helps guide every design choice.
2. Know Your Target Audience
Your design should speak directly to the people wearing it.
Consider:
- Age group
- Gender
- Lifestyle
- Interests
For example:
- Minimal designs work well for corporate and workwear
- Bold graphics and colours suit streetwear and youth brands
- Simple logos are ideal for uniforms and staff clothing
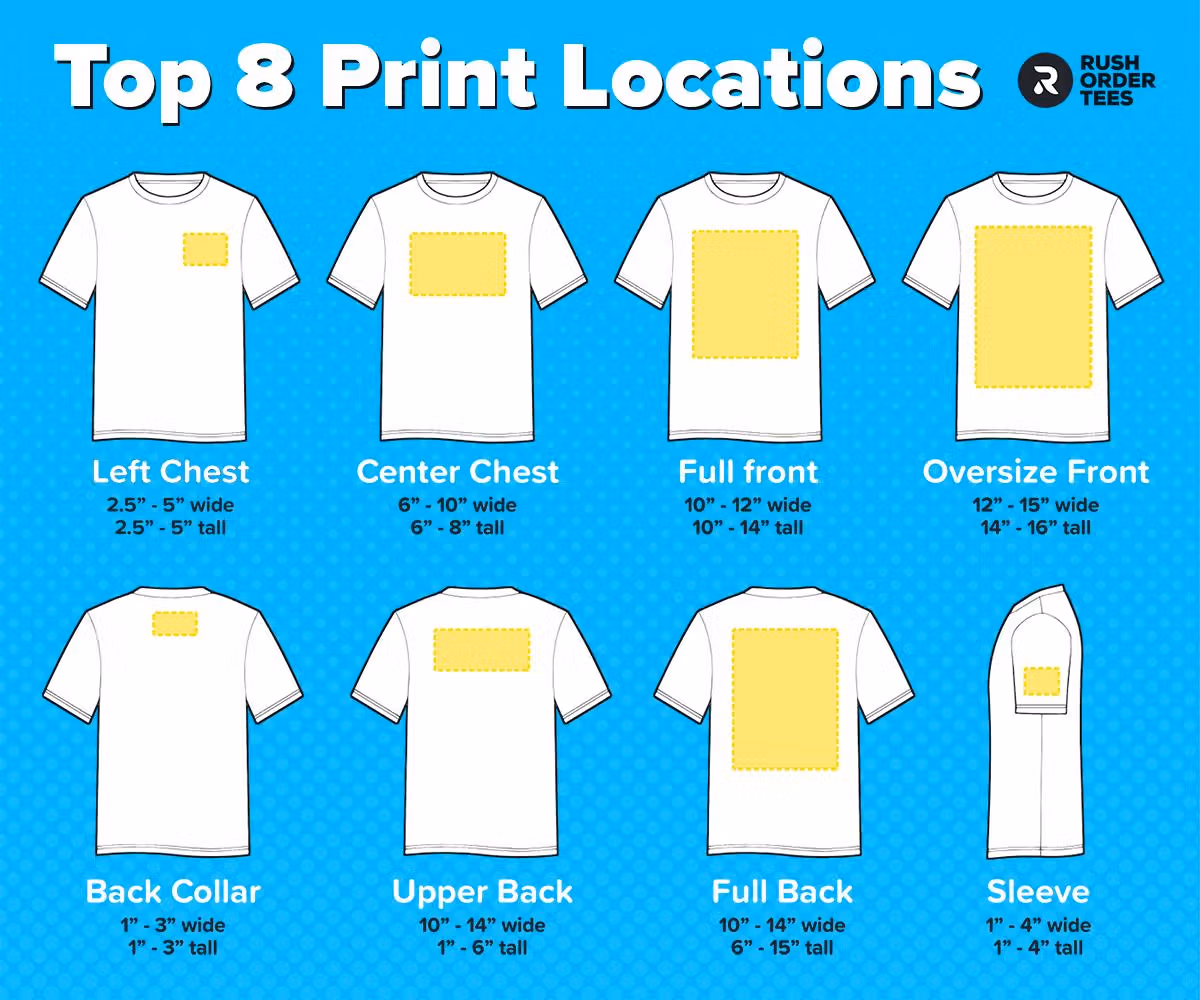
3. Choose the Right Design Size & Placement
One of the most common mistakes is poor placement.
Popular placement options include:
- Centre chest
- Left chest (logo style)
- Full front
- Back print
- Sleeve print
Make sure the design:
- It is not too large or too small
- Sits correctly on all shirt sizes
- Leaves enough margin from seams
4. Use Print-Friendly Colours
Not all colours print the same way on fabric.
Tips:
- Use high-contrast colours for readability
- Avoid very light colours on light shirts
- Test colours on dark and light backgrounds
Also consider the printing method:
- Screen printing works best with limited colours
- DTG and DTF handle full-colour designs better
5. Select the Right Font (If Using Text)
Text-based designs need clear and readable fonts.
Checklist:
- Is the font easy to read from a distance?
- Does it match the brand style?
- Is spacing (kerning) correct?
Avoid using too many fonts. One or two fonts per design is usually enough.

6. Use High-Quality Artwork
Low-quality images result in poor prints.
Always ensure:
- Images are high resolution (300 DPI)
- Vector files are used where possible (SVG, AI, EPS)
- No pixelation or blurry edges
This is especially important for screen printing and embroidery.
7. Match the Design to the Printing Method
Your design must be suitable for the printing technique being used.
Quick guide:
- Screen Printing: Simple, bold designs, limited colours
- DTG Printing: Detailed, photo-style artwork
- DTF Printing: Full-colour, versatile designs
Embroidery: Simple logos, minimal detail
Always confirm print compatibility before finalising the design.
8. Test the Design With a Mockup
Never skip mockups.
Mockups help you:
- See how the design looks on a real T-shirt
- Test different shirt colours
- Spot alignment or sizing issues
Tools like Canva or Placeit make this step quick and easy.
9. Check Brand Consistency
If the T-shirt represents a business or brand, make sure:
- Logo usage is correct
- Brand colours are accurate
- Fonts match existing branding
Consistency builds trust and recognition.
10. Do a Final Print-Ready Check
Before sending the design to print, confirm:
- Correct file format (PNG, PDF, AI, SVG)
- Transparent background (if needed)
- Correct colour mode (CMYK or RGB as required)
- Design is correctly sized
This final step prevents costly errors and delays.
Quick T-Shirt Design Checklist Summary
- Purpose defined
- Target audience identified
- Correct size and placement
- Print-friendly colours
- Readable fonts
- High-quality artwork
- Printing method matched
- Mockup tested
- Brand consistency checked
- Print-ready file confirmed
A perfect T-shirt design is not just about creativity, it’s about planning, precision, and print awareness. Following this checklist helps ensure your T-shirts look great, print cleanly, and deliver the results you expect.
Whether you’re a designer, brand owner, or printing company, this checklist will help you create better T-shirts every time.